Konverter Penanda
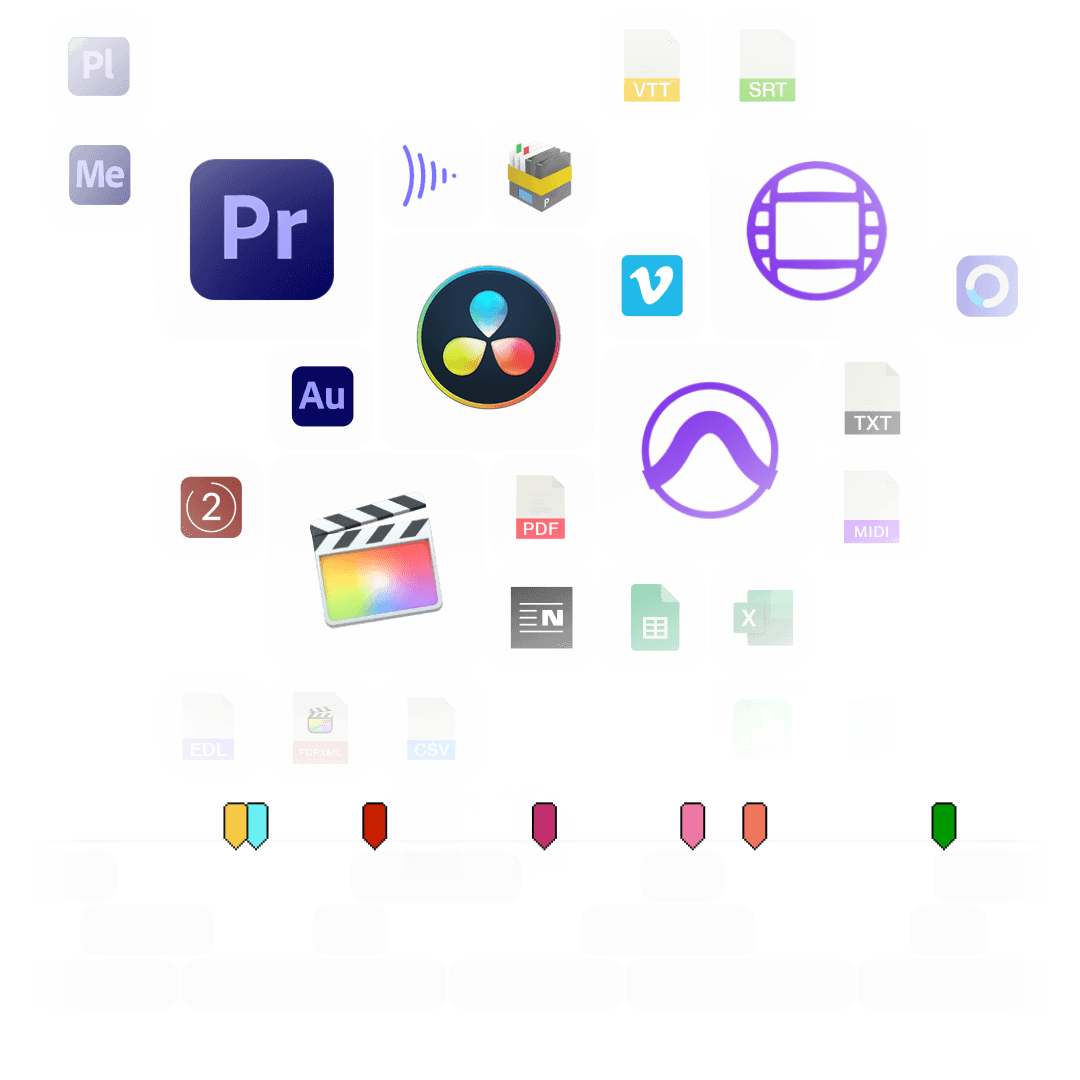
Konversikan Penanda Garis Waktu Anda dari dan ke Adobe Premiere Pro, DaVinci Resolve, Frame.io, Subtitle SubRip, CSV, PDF, dan banyak lagi.
sedang diproses...
Warna Penanda
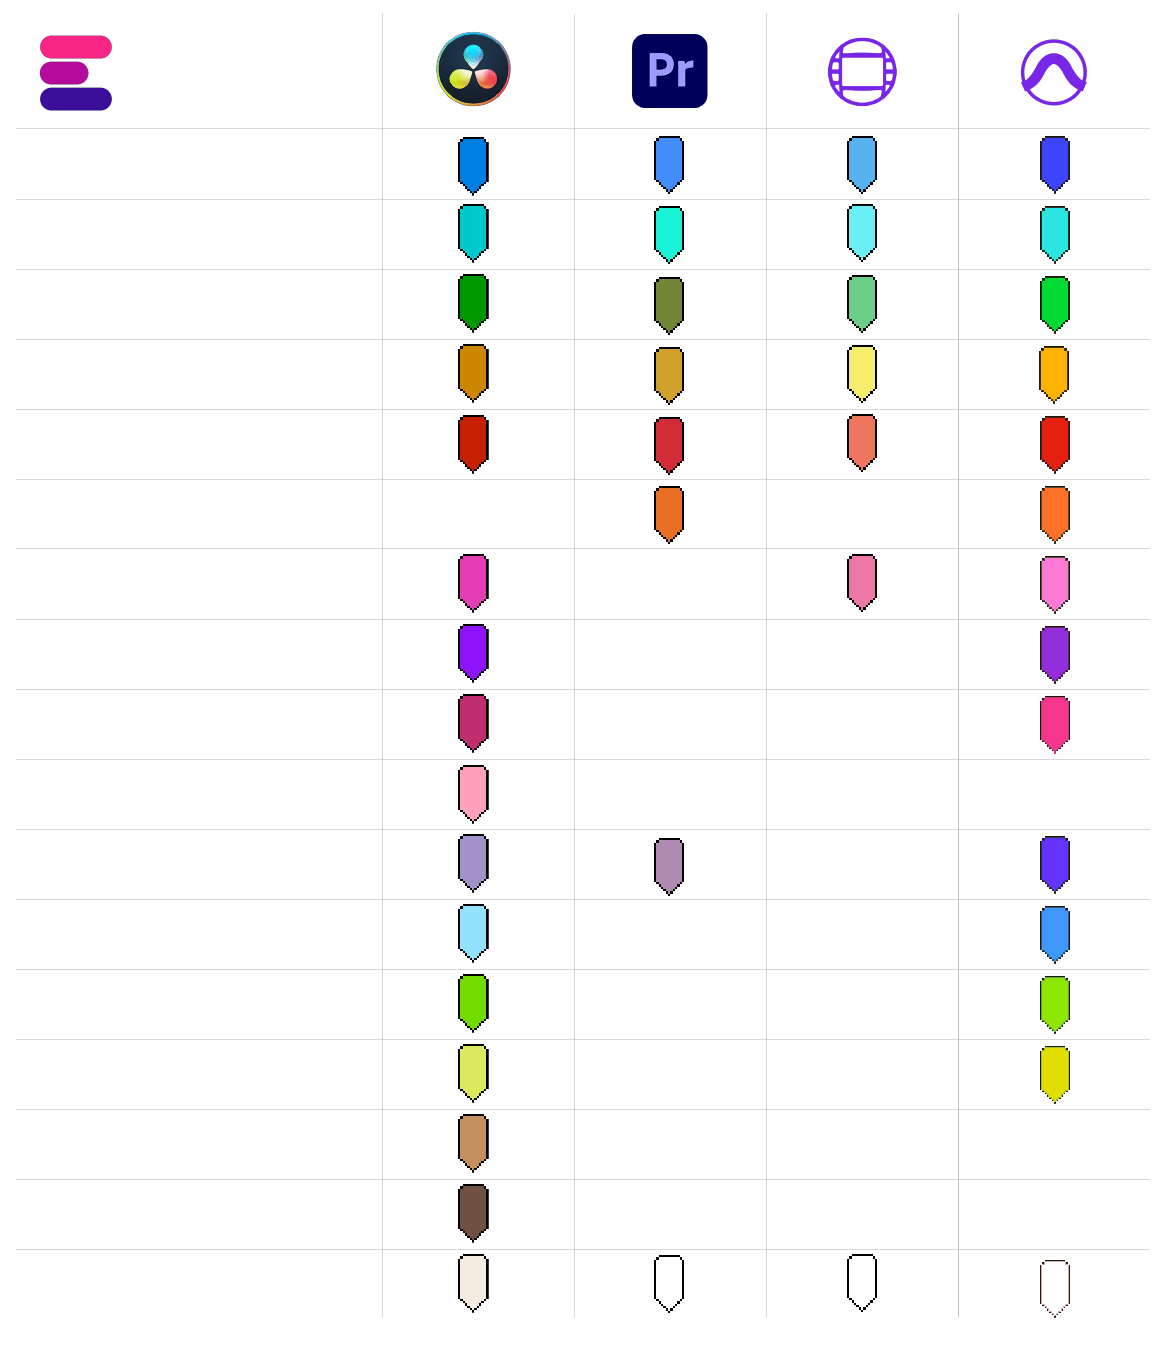
Tidak ada aturan yang seragam untuk warna penanda dalam perangkat lunak yang beragam. Setiap program menggunakan nada warna yang berbeda dan sebagian juga memiliki nama warna yang berbeda. Konverter penanda dari EditingTools.io mencoba menetapkan warna penanda ke kelompok warna yang paling dekat. Dengan grafik ini, Anda mendapatkan gambaran umum mengenai warna mana yang dikenali dan bagaimana warna tersebut ditafsirkan.
Warna penanda default
Anda dapat menentukan warna penanda bawaan yang akan digunakan, jika tidak ada warna yang ditentukan atau tidak diketahui dalam file impor.
Penanda filter
Dengan fungsi ini, Anda bisa menyeleksi penanda dan menentukan bahwa hanya penanda tertentu saja yang dikonversi. Jika Anda ingin menyeleksi lebih dari satu warna, silakan gunakan fungsi "ubah warna penanda".
Geser semua penanda (Offset)
Gunakan fungsi ini untuk memindahkan semua penanda dalam kisaran tertentu. Anda dapat memasukkan nilai positif atau negatif.
Sertakan penanda klip
Aktifkan opsi ini untuk menyertakan penanda klip dari Premiere Pro XML dan FCP7 XML. Opsi ini juga akan menambahkan id trek, nama klip, sumber, timecode sumber masuk, dan timecode sumber keluar ke ekspor CSV.
Tetapkan nama penanda berbasis warna
Timpa nama penanda dan tetapkan judul penanda terpisah untuk setiap warna. Contohnya, Anda bisa secara otomatis menamai semua penanda kuning "VFX" dan semua penanda biru "ADR" tanpa kehilangan deskripsi.
Ubah warna penanda
Gunakan fungsi ini untuk menetapkan ulang warna penanda. Tentukan saja warna penanda yang baru melalui bidang pilihan. Anda juga dapat menggunakan opsi ini sebagai filter warna lanjutan.
Gabungkan beberapa file penanda
Anda dapat mengunggah hingga 20 file penanda yang berbeda secara bersamaan dan menggabungkannya ke dalam satu file penanda. Harap diperhatikan, bahwa semua file ini harus dalam format yang sama.
Mulai Urutan / Mulai Sesi
Masukkan Timecode Mulai sesi atau urutan penyuntingan Anda, jika Anda menggunakan selain 00:00:00:00. Ini diperlukan, misalnya, jika Anda mengonversi ke Avid Pro Tools dan Adobe Premiere Pro atau dari Frame.io atau Pix ke format lain.
Konversi klip video menjadi penanda
Anda bisa memilih file EDL dan mengubah setiap klip menjadi penanda. Hal ini berguna untuk menandai semua bidikan VFX sekaligus, misalnya. Letakkan pada track terpisah dalam program penyuntingan dan ekspor EDL hanya dengan trek video ini. Atur bidang "Konversi dari" ke "Konversi klip dari EDL menjadi penanda".

Format yang didukung
The following applications and file formats are supported among others. See our instructions for each format below.
| Editing Software | Adobe Premiere Pro, Adobe Audition, Apple Final Cut Pro, Avid Media Composer, Avid Pro Tools, DaVinci Resolve |
|---|---|
| Review Tools | Frame.io, Vimeo Review, Dropbox Replay, Pix Systems, NoteTracks Pro, Krock.io |
| Subtitles | SRT, VTT, SBV, (more in our Subtitle Tool) |
| Docs & Sheets | PDF, CSV, Text, Excel, Google Sheets, Apple Numbers, OpenDocument Spreadsheet, TSV |
| Other Tools | oTranscribe, Adobe Prelude Live Logger, NanoLokit Logs |
How to import timeline markers?
Go to "File -> Import" and select the xml file.
How to export timeline markers?
Select the sequence in your project tab.
In menu, got to: "File -> Export -> Final Cut Pro XML"
Select "Final Cut Pro XML" and hit ok.
You can use Adobe Prelude Live Logger app to create live timecode notes and tags which you can export and convert in this tool into other marker formats.
How to import timeline markers?
Go to: "Tools -> Marker"
Right Click: Import Markers
Select the generated "xml" or "txt" file from EditingTools.io.
How to export timeline markers?
Go to: "Tools -> Marker"
Right Click: "Export Markers as XML" OR "Export Markers as Text"
Can I set marker durations to one frame?
Select "Cange marker duration" from the "more options" menu.
Can I overwrite the marker name in Avid Media Composer?
Yes, you can overwrite the marker name within the marker description field in Media Composer. Simple use "|" to seperate the name and the description in Media Composer. When you import the markers to EditingTools.io, it will be splitted into name and description.
What else should I know?
Avid Media Composer might fail importing markers if they overlap.
There are 3 different ways to bring markers into Avid Pro Tools. The most suitable of these 3 is the Pro Tools PTX format.
| PTX Session Data | MIDI File | EDL File | |
|---|---|---|---|
| Marker colors | Yes | No | No real markers but clips with the marker name as clip name. |
| Individual Session Timecode Start | Yes | Yes | Not relevant |
| Adjustable audio pull rate | Yes | No | Not relevant |
| Adjustable sample rate | Yes | No | Not relevant |
| Import new markers at a later time | Yes | No. Pro Tools allows only one Midi track with markers per session. | Yes |
How to import PTX markers into Pro Tools?
In ProTools, go to "File > Import > Session Data". Select and open the generated ".ptx" file. In the "Import Session Data" window, make sure the "Ruler Markers / Memory Locators" box in the lower "Session Data" panel is checked. Press "OK" and your markers will be imported.
Why are PTX conversions not free?
The PTX converter was developed in partnership with Sounds in Sync. Therefore, we are currently unable to offer the converter for free.
How can I convert unlimited PTX files?
We are currently unable to offer a flat rate for PTX conversions. If you need unlimited conversion, you can have a look at EdiMarker from Sounds in Sync. But since most users do not need a ptx converter often, our marker converter is usually the cheaper option.
How to import MIDI markers into Pro Tools?
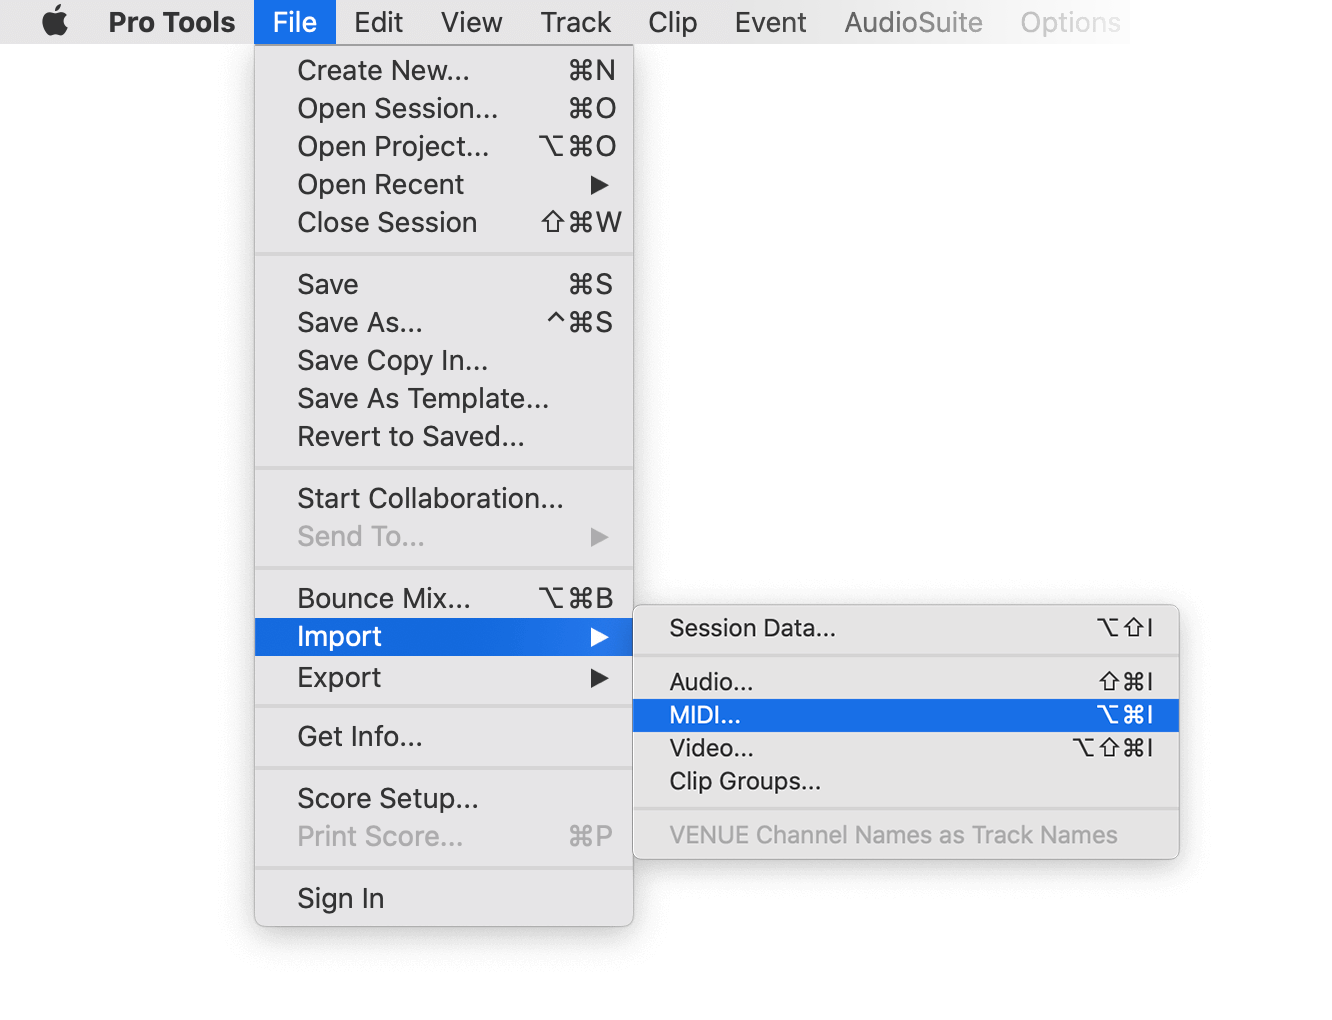
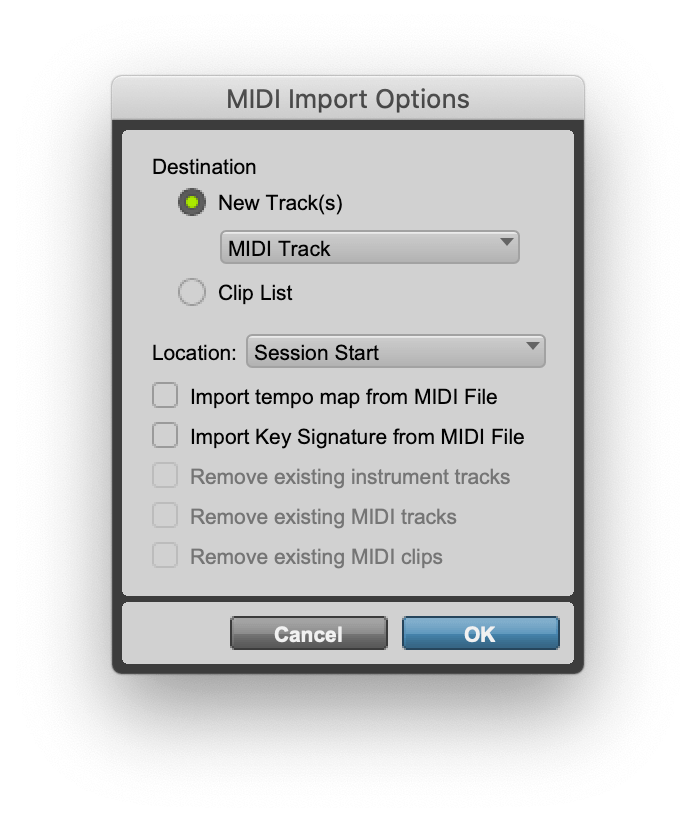
Under "File -> Import -> Midi" you can import the generated marker file into Pro Tools. Select the file and then "Add Midi Track". Attention, if there is already a midi track with markers you have to remove them first. If your session is not at 00:00:00:00 the imported markers have an offset. Therefore, when converting, specify your timeline start timecode from your Pro Tools session (you can find this option under "more Options" in the form above). Often this is 01:00:00:00.
How do I export markers from Pro Tools?
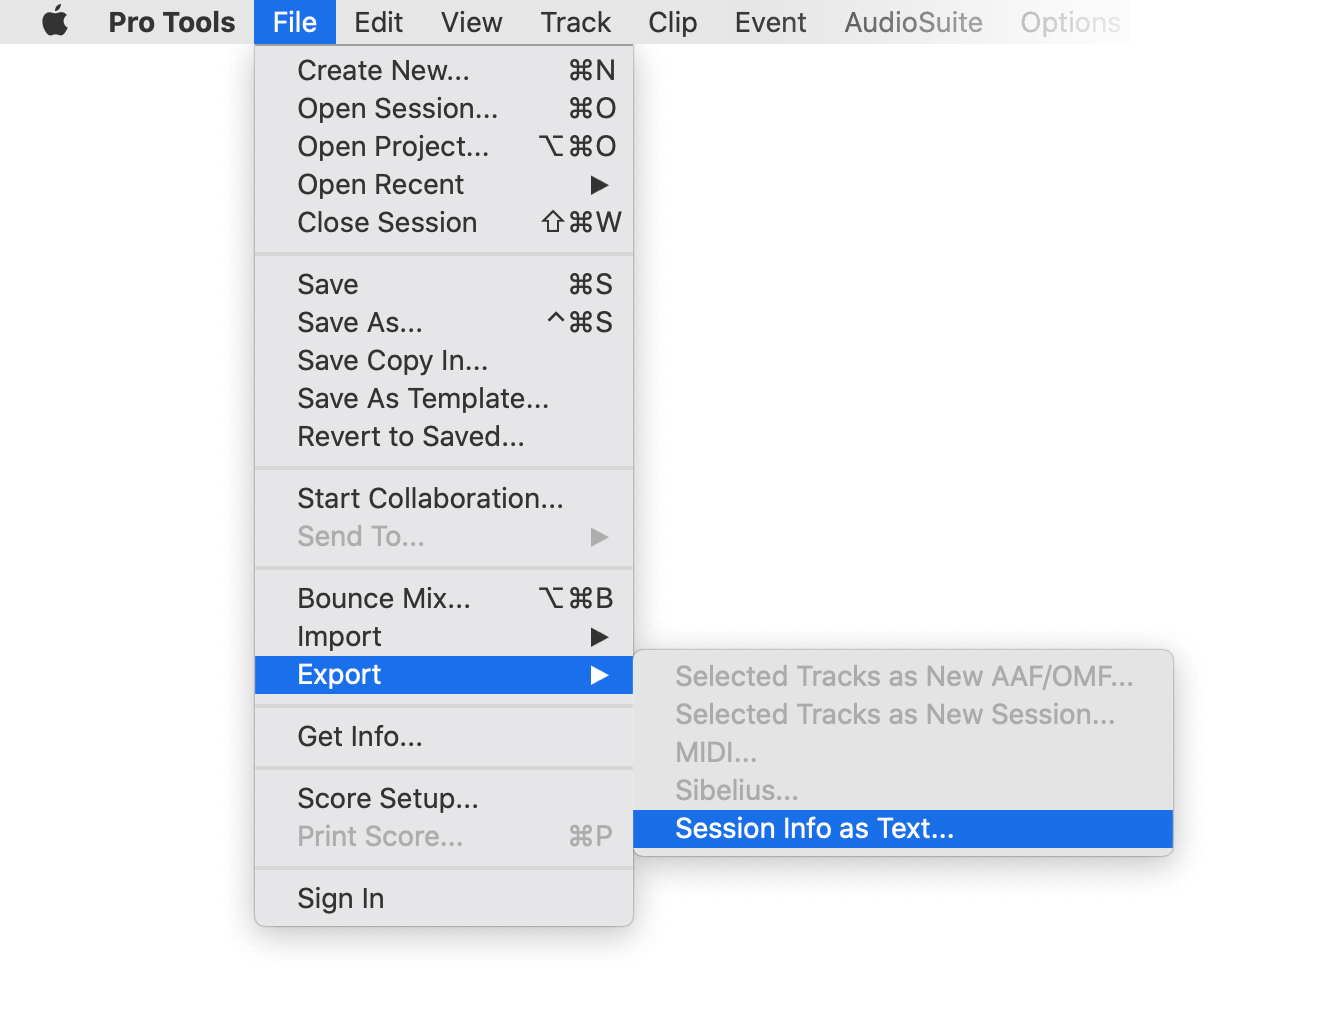
Under "File -> Export -> Session Info as text" you can export the markers from Pro Tools.
How to import timeline markers?
1. Create a new timeline or open a timeline in your project
2. Make a right click on the sequence timeline in your media tab. It will open an popup.
3. Navigate to: Timelines > Import > Timeline Markers from EDL
3. Select the edl marker file for Resolve and the markers will be loaded.
- In case you don’t see any markers, make sure they are in the right timecode area and try to zoom out of your timeline.
- If you can not find the option „Timeline Markers from EDL“ make sure you selected a sequence in your media tab.
- Resolve does not support special chars in markers.
How to export Timeline Markers?
1. Select the sequence in your media tab.
2. Make a right click on the sequence timeline in your media tab. It will open an popup.
3. Navigate to: "Timeline > Export > Timeline Markers to EDL (.edl)"
How to export Clip Markers?
1. Select the sequence in your media tab.
2. Make a right click on the sequence timeline in your media tab. It will open an popup.
3. Navigate to: "Timeline > Export > Edit Index (.csv)"
How do I export markers from Pix?
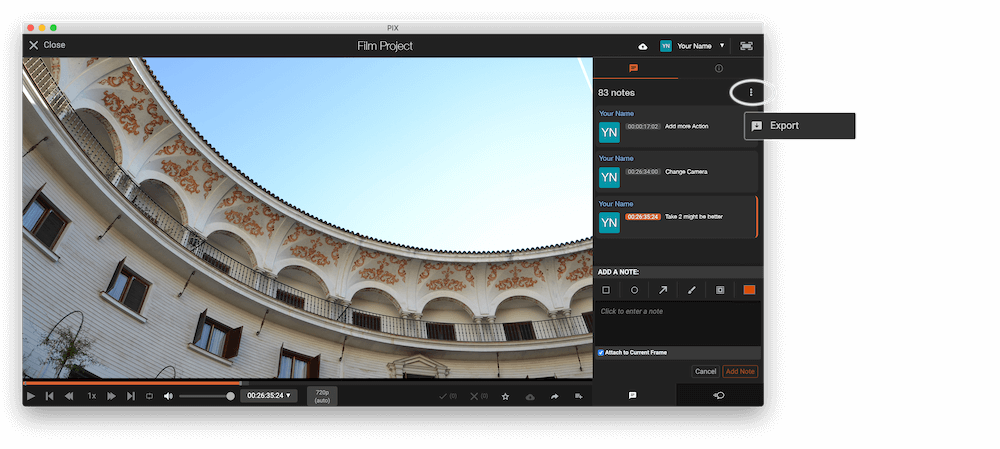
Open the comments panel on the right side in Pix. Press the three dots and select "Export". You can then download a CSV file from Pix that you can import into EditingTools.io. The timecode in Pix starts with 00:00:00:00 for each clip, so you may need to use the offset function on EditingTools.io to sync it with you timeline or move it manually in your editing software.
Export markers from frame.io in marker menu "Download as File" > "CSV".
Export review notes from your project on vimeo.com as "CSV". Select "Vimeo Review" in the tool as "from" value.
You can use this tool to convert markers to YouTube Chapter Markers for the video description. Select "Convert to" to "YouTube Chapter Markers (.txt)". Open the generated .txt file and paste its contents into your video description.
To export markers and comments from NOTETRACKS Pro, click the Download button in your active session and select "NoteTracks.com > Audition Markers (.csv)". In our Marker Tool, select Convert from "NoteTracks.com > Audition Markers (.csv)".
NOTETRACKS Pro is an online review platform for audio creators. Learn more about it on notetracks.com.
To export comments from Krock.io, select a video and open the menu via the three dot icon. Select "Export comments to csv" to export the comments. In the marker converter select "Krock.io" as "convert from" value.
Krock.io is an online media content review tool. Learn more about it on Krock.io.
Convert comments from E-Mail, Word, Pages, Slack, Chats or any other clean Text Source into markers using the Textfield option. Simply copy and paste the comments into the textfield. Makes sure the comments follow the basic rules to be recognized correctly:
- Each comment needs to be in a new line
- Each line needs to start with a timecode
Example Input:
			0:32 Please add Music

			1min Intro

			1:55min Add Cut

			17.6min VFX Shot?

			21:12 Add Detail Shot

			23.1 VFX

			75:20 Credits?
Which time formats are recognized?
1:32, 01:32, 00:01:32, 1.32, 01.32, 1:32min will be converted to TC 00:01:32:0075:20, 75:20min, 75.2 will be converted to TC 01:15:20:00
How do I import markers into Google Sheets?
Open Google Sheets and go to "File -> Import". Upload the generated CSV file and press "Import Data" to generate a Sheet with all markers.

How do I export markers from Google Sheets?
Go to "File -> Download -> Comma-separated values". Make sure your Google Sheets matches the csv rules. The first line needs to contain at least the columns "Timecode In" and "Name" or "Comment". If you are not sure about the file headers, download the CSV demo file here: demo_marker_file.csv. Read more about the headers in the CSV Tab.

Markers can be exported as XLSX or XLS files for Microsoft Excel.
Markers can be exported as ODS (OpenDocument Spreadsheet) file for Open Office Calc.
How do I import markers into Apple Numbers?
Open Numbers and go to "File -> Open". Simply open the CSV file.

How do I export markers from Apple Numbers?
Go to "File -> Export -> CSV". Make sure your file matches the csv rules. The first line needs to contain at least the columns "Timecode In" and "Name" OR "Comment". If you are not sure about the file headers, download the CSV demo file here: demo_marker_file.csv. Read more about the headers in the CSV Tab.

Can I write my own CSV File?
Yes. Just take a look at our demo files to match the rules for correct interpretation. The marker converter accepts comma-, semicolon- and tab-separated files.
Download the CSV demo file here: demo_marker_file.csv.
Marker CSV Preset in Google Sheets: Open in Google Drive.
- Timecode In
- Timecode Out
- Name
- Comment
- Color
blue, cyan, green, yellow, red, orange, magenta, purple, fuchsia, rose, sky, mint, lemon, sand, cocoa, white, blackHow do I convert subtitles into markers?
Simply select your subtitle file.
Can I convert markers into subtitles?
Yes, it is possible. Have a look at our Subtitle Tool. There you can convert markers into subtitles with a lot of options like "Min. Subtitle Duration" and many more: Subtitle Tool & Converter
To export a PDF, select pdf as output format.
You can use otranscribe.com to generate your markers from any audio or video file.
To export the markers go to "Download Transcript as" and download your script as "oTranscripe format (.otr)".
Ambient's NanoLockit is a great way to log takes on set. The log files (.markers) can be converted to any other format using this marker converter.
Learn more about the NanoLockit on ambient.de/collections/nanolockit
You can export comments from Dropbox Replay in JSON format to convert them with our tool.
- To export comments log in to replay.dropbox.com.
- Open the Replay project.
- Right click in the Comments panel -> Export comments
- Choose .JSON as export format
Automate your workflows with our API
Whether you're a developer or just want to automate more processes with tools like Zapier or Make, you can easily integrate this tool into your workflows with our API. Learn more about integrating the REST API in our API documentation.
API Documentation
Get more with Pro
Our free marker tool offers a huge amount of features to convert and modify files. However, there are some limitations on the free tier that require a PRO subscription to unlock.
Check out all Pro Features| Free | Pro Users |
|---|---|
| Fair Use conversion limit | No conversion limit |
| Files with up to 1200 markers | No length limit |
| No file encryption | File encryption |
Tags
Converter CSV EDL JSON MIDI OpenTimeline IO PDF PTX SBV SRT TXT VTT XML ProTools - Session Info as Text (.txt) Adobe Premiere Pro Avid Media Composer Avid Pro Tools DaVinci Resolve Dropbox Replay Final Cut Pro Frame.io
